Key Facts:
- A new tool has been introduced in Lightroom and in Camera RAW, it allows to subtract a portion of a local adjustment (graduated filter, radial filter, adjustment brush).
- These subtractions can be defined by luminosity or color.
- There is a great similarity with the adjustment layer with a blend-if applied to it.
- For the first time ever we have a layer-based logic, although with limitations.
- Both the Photoshop adjustment layer with blend-if and the Camera RAW (or Lightroom) local adjustments with range mask have pros and cons.
Adobe’s latest updates
As always Photoshop’s update is received with disappointment and some rage by the colorists community. We’ve been told, and then repeated, that the subscription business model would have end the “point release” system, in favour of a continuous stream of improvements. Still, this is once again a new app, that will completely remove the previous installed version. The cycle is indeed faster, I’m counting six major releases in the CC era in the last four years. The six major pre-CC releases of Photoshops required nine years. We could argue that Photoshop and Lightroom releases are not forcibly bundled in the full Creative Suite, but in the end only one thing is important: are there any good news for us?
I’m afraid not, in Photoshop itself. Still the same issues with a dated, complex, messy, user interface. Once again some relevant tools like Blend-if haven’t received love nor updates for decades. There are no new tools for colorists. Trying to be generous it seems that the resizing, and content-aware fill tool algorithms have been replaced, although serious testing is needed before saying they’re actually better.
Lightroom, that is now being rebranded “Adobe Lightroom Classic CC” (I don’t even know how they can came up with a name like this) adds the usual lens and camera profiles from the new ACR10, but it also have a new tool, that is in my opinion represent a significant revolution.
Camera RAW and Photoshop differences
When we are working in Camera RAW (and let’s remember this means that we can be in Ligthroom, in Camera RAW’s window, or in a Photoshop’s filter) we’re dealing with an ever-present series of sliders and tools, that we can tweak when we want. There are many workflows that recommends to follow a path, but this is more about being consistent and having a direction. It is not about quality, it is about speed. We can change exposure, and then contrast, or doing just the opposite, and the result would be the same. This means as well that I can set back all my changes, or some of them, anytime.
In Photoshop things are much more complex. There are tools that are available only in certain color methods. We have hundreds of functions often buried in obscure sub-menus. Many changes can’t be reverted (apply an s-curve, and then an inverted s-curve will ruin your image). And this is why Adobe spent a great amount of effort (although with a serious lack of vision) introducing tool after tool like layers, adjustment layers, masks, smart objects, history, and many others to allow users to subtract changes, or have chances to revert to a previous state.
This is also why many users online recommends Lightroom workflows where tools are divided in comfortable tabs, but it is needed a serious professional to forge the structure of a Photoshop’s workflow. It is a time consuming process, and it is something that can only be addressed to other pros, that will continuously evaluate the situation.
In my opinion Range Mask is the most important tool of the last ten years.
It is also a good time to remind ourselves that learning these two apps is a much different experience. Effectively learning Photoshop is much more time consuming, it also requires a lot of time and effort to actually test that what we think is true is true indeed. And that many, many times our solutions gravitate around Photoshop inner inconsistencies, bugs, poor management choices.
Why are we still working in Photoshop? Freedom and flexibility are two good answers. We can apply extreme transformation, and keep only what we really need, while in Lightroom some tools are limited (as they probably should be when we consider photography). Also Lightroom and Camera RAW have no layers, no masks, no opacities. This is why Adobe added local adjustment tools. Graduated filter, radial filter, adjustment brush provided for years an imitation of freedom for the users that refused to open Photoshop. But this was just a lousy fix. The problem is that filters are too wide for precise adjustment, and with brushing is impossible to avoid halos on transitions. This is why subtracting is so important, it is essential to apply an adjustment that is actually local.
Range Mask: analysis
From now on we will be able to subtract (philologically I don’t think “masking” is the right term to use) from a local adjustment. The best way to evaluate this tool is to use it.
Range Mask is available for one or more graduated filter, radial filter, adjustment brush
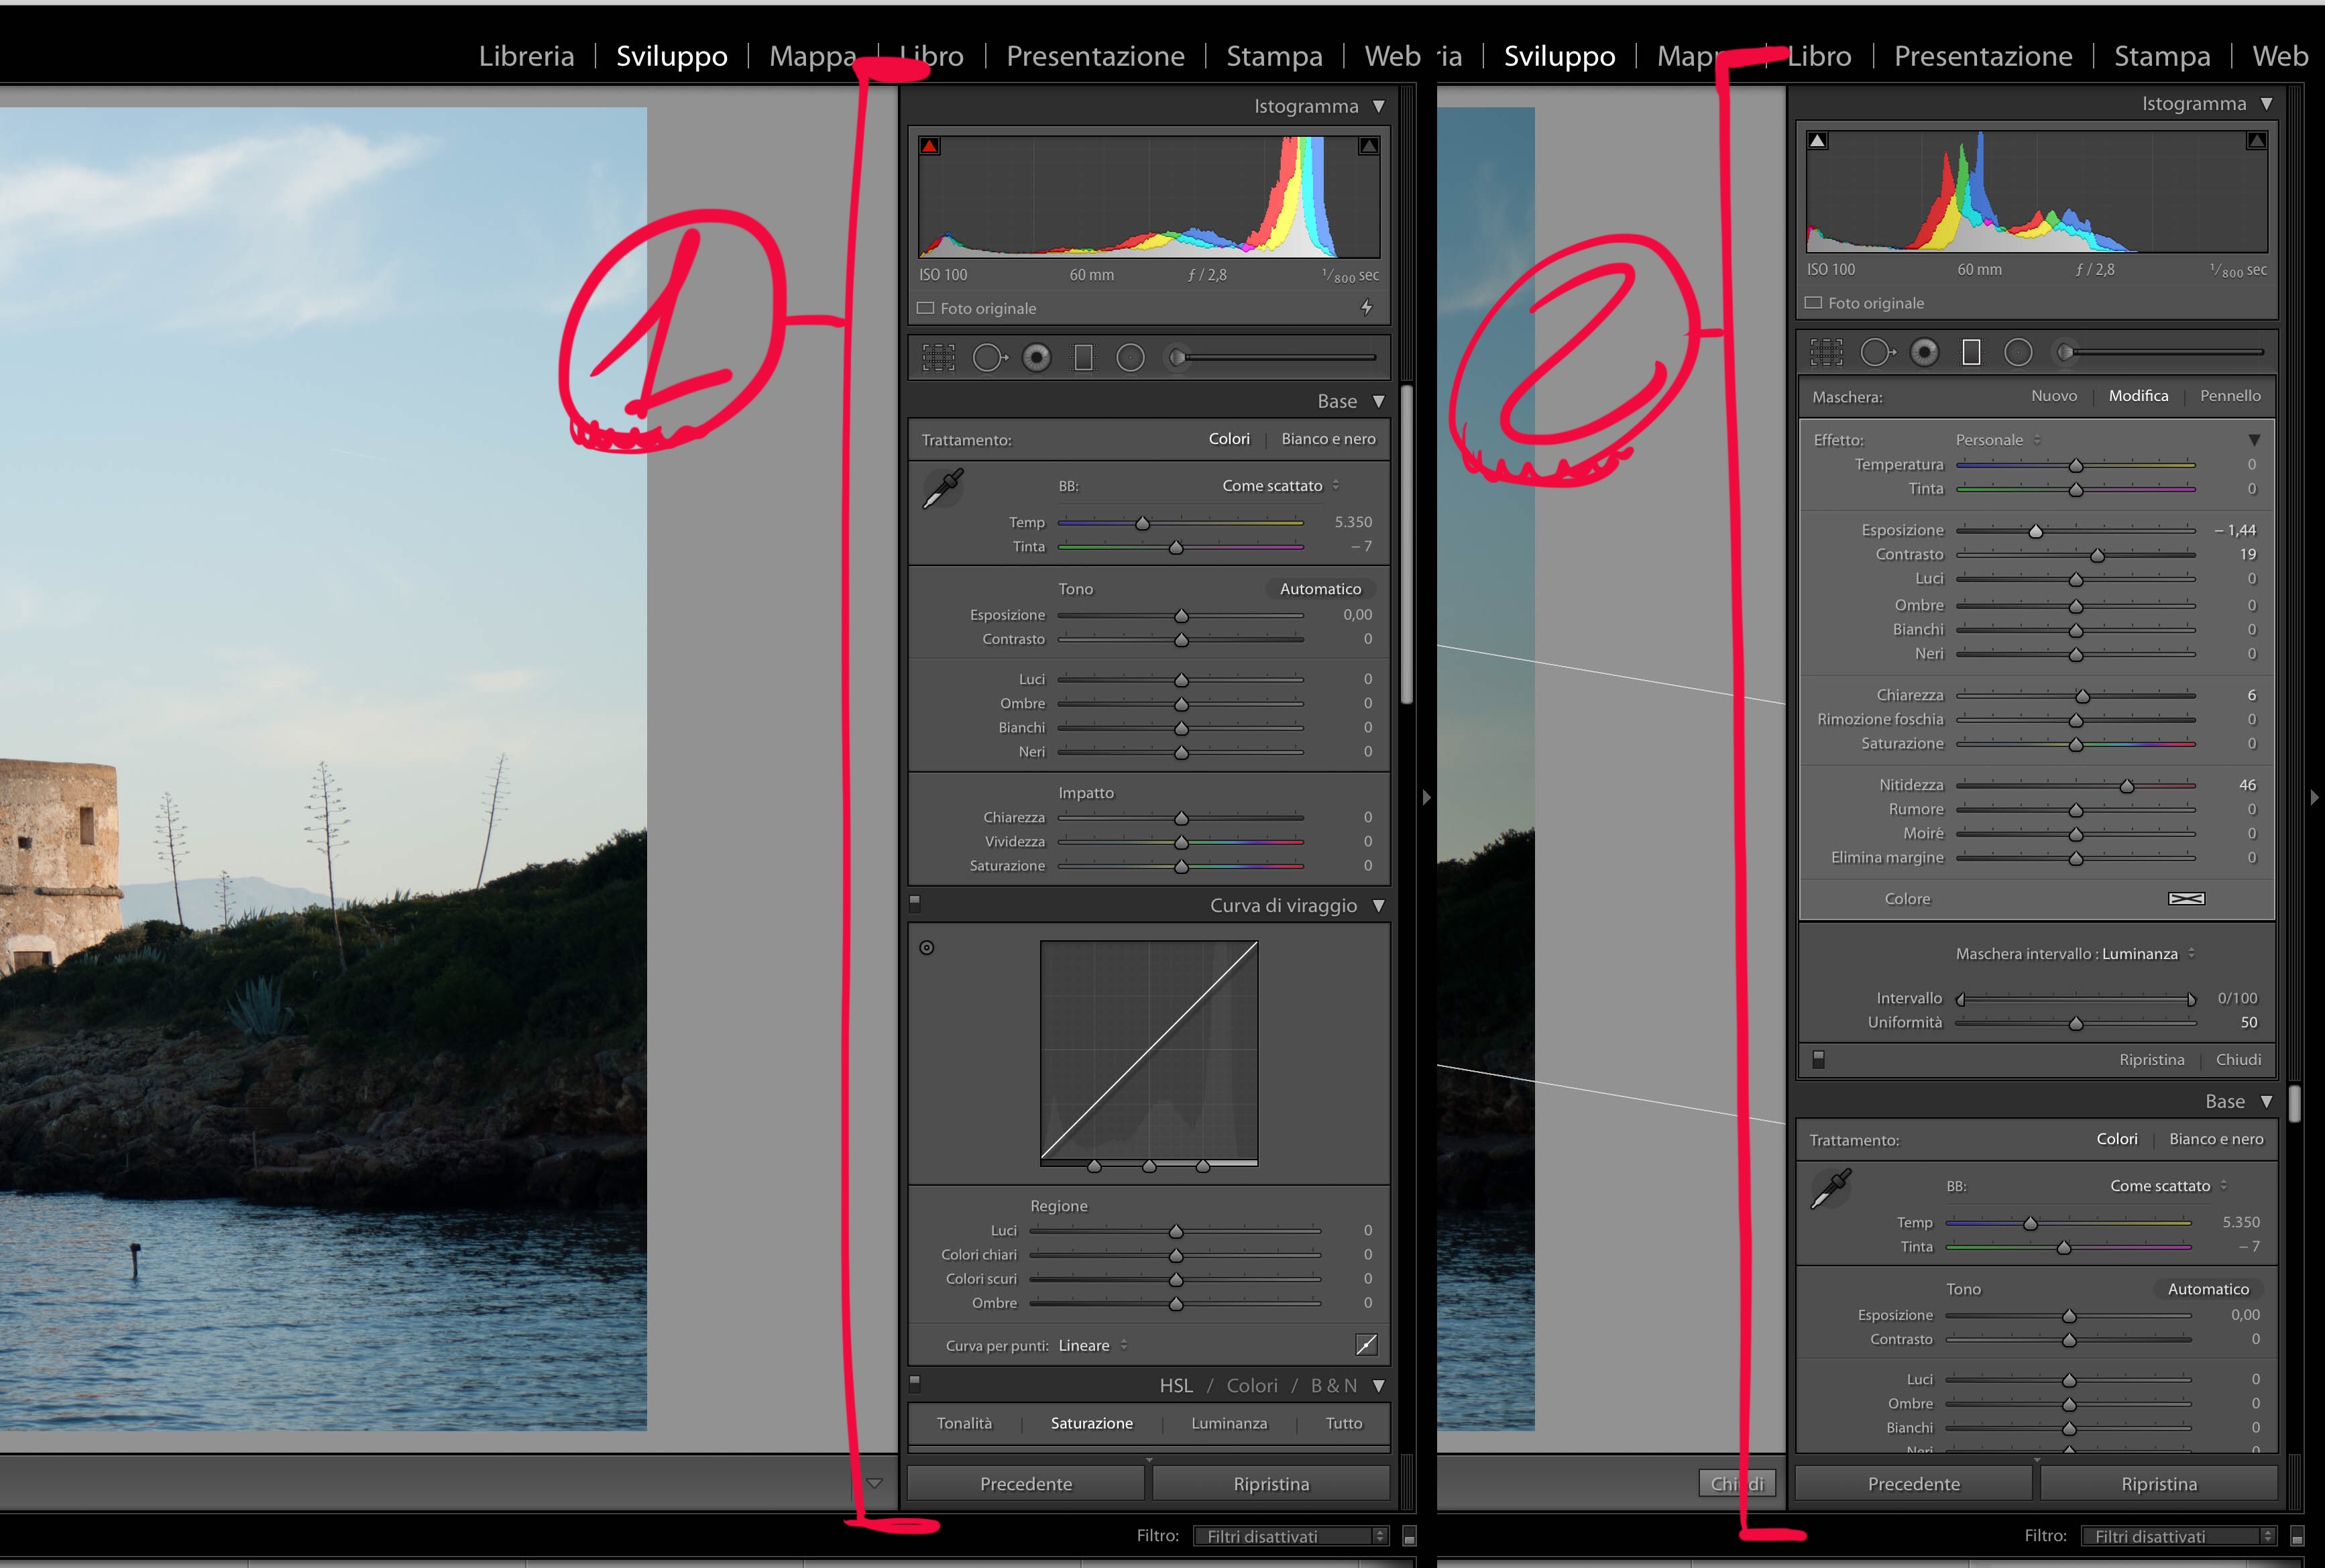
Adobe’s Team choice has been to let the user choose to subtract on a color, or luminance, basis. This may be a technology limitation imposed by RAW.
Like in Blend-if when we’re talking about color and luminance values we’re talking about underlaying layer’s values. There are no layers in Lightroom of course, so this is actually referring to the original image (that could already be post-produced) before the local adjustment we’re using Range Mask on. Let’s see the differences between color and luminance.
Range Mask: luminance
If we choose to use luminance to operate the Range Mask we will see two different sliders, range and smoothness.
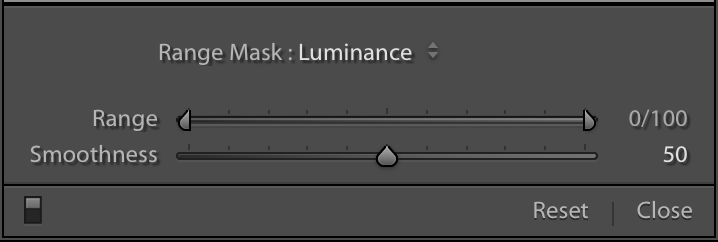
Range works almost exactly like a single slider from the Blend-if tool, it allows to define the range of values where the local adjustment will be kept, and what falls in the two extremes will be subtracted. The differences with Blend-if, not so tiny, are that there is no separation, the minimum range allowed is five points and that it is not possible to invert the selectors (not a great choice, this means that we can only subtract the extremities and not the middle values).
Smoothness allows to operate on the transition between the maintained and subtracted adjustment. It is unclear if it is a blur or another range, chances are it is quite a complicated calculation.
Range Mask: color
If we will choose to subtract by color we will have a single slider, but before we can use it we need to select a color, multiple colors, a range of colors or a combination of colors and ranges.
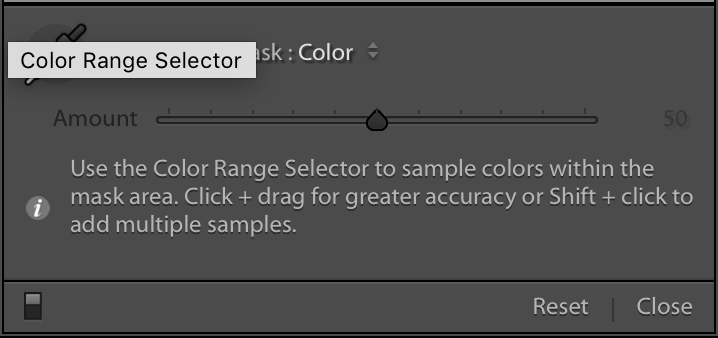
There is a dedicated color picker, we can click once to select a single color. Click again while holding SHIFT to add another color. We can click and drag to select a range of colors (recommended), and using SHIFT and drag to add a range. There are some limitations, for example no more than five single colors at the same time.
Once our chromatic operator has been defined we can operate on the amount slider that will expand or shrink the chromatic range that will be used for the subtraction. This also means that, by default, a quite wide range will be used even with just a single color chose by the user.
The Lightroom Photoshop dualism
My opinion is that this simple, incomplete, tool may represent the beginning of the end. Not for Photoshop, but for the Lightroom / Photoshop dualism. There is no other field where pros need to switch back and forth two different softwares that serve the same purpose.
This is also not an easy issue to solve, not for colorists not for Adobe. Photoshop not only is a complete software, it also encompasses diverse disciplines, or at least it tries to, from medical imaging and 3d to video and web. At the same time Adobe chose to develop a dedicated app for colorists and photographers and built Lightroom.
And this is where things get complicated. Photoshop is an app to work on (mostly) single images. But colourists and photographers are usually working on set of images. We can work with a Camera RAW plugin in Photoshop to implement RAW processing, and we can tolerate the slow drip of advanced features/workflows from Photoshop in Lightroom. But in the end it will win the app that will allow pros to handle multiple images.
Finally, Lightroom is quite easy to approach, learn, and experiment with. Photoshop is not. Let’s not forget Photoshop was marketed almost five times as expensive as Lightroom.
All of this is why this little tool is so revolutionary. Until now local adjustment where a big no for me. Brushing was not really usable in transitions, and I think (both in training and retouching) that brushing for more than three to five seconds is a bad practice.
What Range Mask will change for colorists
I hope this change will have enough momentum to simplify things for pros and to help educators empowering creatives in a better, more organic, way. But even now our workflows can seriously improve, especially if you want to try to avoid Photoshop in most of your work.
The limit before Range Mask was met everytime we were in need of a change that was simply impossible in Lightroom or Camera RAW. But we now can apply just a larger correction, and then subtract the excess. More than once.
At an operative level it is (almost) like if Adobe introduced layers in the RAW processing. We open our photo and we start as usual with the full-frame RAW processing tools. As soon as we add a local adjustment we’re dealing with a new set of tools, and this for every new local adjustment.
Still this pseudo-layers have limitations, of course, blend modes, opacity, real masking are not available, but we’re operating in RAW! It is not possible for me to stress the importance of this enough.
The Photoshop adjustment layer plus blend-if couple will stay as a more flexible (and totally forgotten by its developer) tool, but let’s not forget about all the elements in the equation. For example that in RAW we can save file changes in a tiny .XMP text file that we can share anywhere in the world in one second, while .PSD files get huge fast, and are essentially new duplicates of your photographs.
New ideas are now available, and a single click away. Brushing noise-reduction, handling multiple color casts, a graduated filter that applies dehaze subtracted where it is not necessary.
Range Mask limits
It is possible that being in a RAW environment forced the developer to ask a user to choose between color and luminance to operate. Still, presenting two different user interfaces is less than ideal.
If we choose color we have a dedicated picker, a slider and a dedicated text that explains it.
If we choose luminance we have no helps, and especially the first slider would need it, given how poor the general public knowledge of blend-if is.
At the time Lightroom was developed it was desirable and fresh to have a limited, fixed, user interface. After so many years of adding things, though, it now became limited and clunky. Using multiple local adjustment is bothersome and slow.
There is also an issue with switching Range Mask methods. If we choose color, for example, and apply a subtraction and then switch to luminance that subtraction will stay in place until something in the luminance sliders is changed. This is useless and can be counter-productive.
Photoshop and the future
Why are we still using and teaching Photoshop? Until today because other tools like Lightroom were incomplete. But if a professional could have a complete workflow in Lightroom would we advise to learn Photoshop as well?
My answer ranges from absolutely no, to depends. Let’s take the obvious out first, if you want to be a professional colorist you learn Photoshop. It is the hard way to seriously understand digital imaging. Especially if you have collaborations with other human beings, where color managements and formats issues arise. In case you want to double check the knowledge of modern colorist just ask them about the importance of comparison.
But if you are a photographer I think it is the time to stop devoting yourself to Photoshop. You don’t need it, you will not probably be able to learn it the right way, and you should probably invest your time shooting anyway.
If you are approaching color correction today, I think learning Lightroom proficiently first, will also give you an honest, direct, and personal answer to that question. You will know better than anyone else, me included.
Learning is a beautiful process, it is never wasted, but we are in a world where there are tons of disciplines to die for, and a severely limited time. The next generations of colorists should start learning Photoshop first in fewer and fewer occasions, examples are pros that also meddle with web, that will need continuous support for CMYK.
This is the first time in my career that I see a single app fit for more than 90% of the professional photographers and colorists world.